Difference between revisions of "How to Scan Photos"
From the Family Tree Forum Reference Library
Darksecretz (talk | contribs) |
|||
| (9 intermediate revisions by one other user not shown) | |||
| Line 1: | Line 1: | ||
| − | + | ==General scanning tips:== | |
| + | |||
| + | *Check photos for dirt or smudges. | ||
| + | *Check scanner glass for dust, fingerprints or smudges - using a lint free cloth to clean the glass. | ||
| + | *Specify the type of scan - when scanning photos you have a basic choice of colour or black and white. Usually best to scan in colour even if source photo is black and white. | ||
| + | *Select best scan resolution. To ensure reasonable quality for enhancement or restoration scan at a minimum of 300dpi (dots per inch). | ||
| − | |||
| − | |||
| − | |||
| − | |||
| − | |||
*Position photo on scanner, face down, and then prescan/preview. | *Position photo on scanner, face down, and then prescan/preview. | ||
| + | |||
*Check position/alignment of photo - amend if necessary. | *Check position/alignment of photo - amend if necessary. | ||
| − | *Check file size - if too large reduce scanning resolution. | + | |
| + | *Crop the previewed image to include only the original photo/document. | ||
| + | |||
| + | *Check file size - if too large reduce scanning resolution or scale. | ||
| + | |||
*Choose file type, scan image, name and save. | *Choose file type, scan image, name and save. | ||
| + | <br><br> | ||
| − | + | ==Visual guide:== | |
| − | ==Visual guide | ||
It is important to read the manual for your scanner to see what options and settings are available. | It is important to read the manual for your scanner to see what options and settings are available. | ||
| Line 24: | Line 29: | ||
[[image:Epson scan3.jpg|centre|700px|thumb|Epson]] | [[image:Epson scan3.jpg|centre|700px|thumb|Epson]] | ||
| + | |||
| + | |||
| + | Back to [[THE CLASSIFIED INDEX OF WIKI PAGES]] | ||
Latest revision as of 18:36, 7 September 2022
General scanning tips:
- Check photos for dirt or smudges.
- Check scanner glass for dust, fingerprints or smudges - using a lint free cloth to clean the glass.
- Specify the type of scan - when scanning photos you have a basic choice of colour or black and white. Usually best to scan in colour even if source photo is black and white.
- Select best scan resolution. To ensure reasonable quality for enhancement or restoration scan at a minimum of 300dpi (dots per inch).
- Position photo on scanner, face down, and then prescan/preview.
- Check position/alignment of photo - amend if necessary.
- Crop the previewed image to include only the original photo/document.
- Check file size - if too large reduce scanning resolution or scale.
- Choose file type, scan image, name and save.
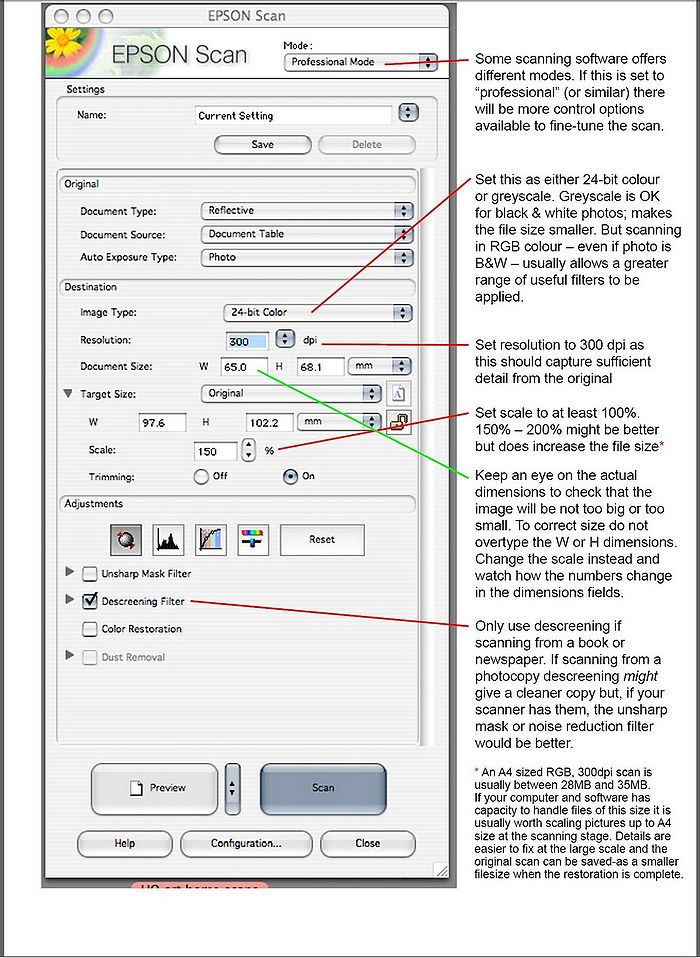
Visual guide:
It is important to read the manual for your scanner to see what options and settings are available.
The following visual guide gives some idea of the optimum settings for scanning photos/documents, particularly for restoration work purposes.
