Difference between revisions of "Working With Images"
m |
m |
||
| Line 44: | Line 44: | ||
It will come out full size and aligned to the left with no border or caption. | It will come out full size and aligned to the left with no border or caption. | ||
| − | <nowiki>[[image:name of image.jpg]]</nowiki> | + | <nowiki>[[image:name of image.jpg]]</nowiki> |
| Line 52: | Line 52: | ||
====='''2. You can choose horizontal alignment''' - right, left or center ===== | ====='''2. You can choose horizontal alignment''' - right, left or center ===== | ||
| − | <nowiki> [[image:name of image.jpg|alignment]] </nowiki> | + | <nowiki> [[image:name of image.jpg|alignment]] </nowiki> |
| Line 60: | Line 60: | ||
====='''3. You can choose the size'''===== | ====='''3. You can choose the size'''===== | ||
| − | <nowiki> [[image:name of image.jpg||size]]</nowiki> | + | <nowiki> [[image:name of image.jpg||size]]</nowiki> |
| − | [[image:InitialsA.jpg| | + | [[image:InitialsA.jpg|50px]] |
=====4. To get a frame round your picture===== | =====4. To get a frame round your picture===== | ||
| − | <nowiki>[[image:name of image.jpg|alignment|size|thumb]]</nowiki> | + | <nowiki>[[image:name of image.jpg|alignment|size|thumb]]</nowiki> |
[[image:InitialsA.jpg|left|200px|thumb]] | [[image:InitialsA.jpg|left|200px|thumb]] | ||
| + | |||
| + | |||
| + | |||
| + | |||
| + | |||
| + | |||
| + | |||
| + | |||
| + | |||
| + | |||
| + | |||
| + | |||
| + | |||
| + | |||
| + | |||
| + | |||
| + | |||
| + | |||
| + | |||
| + | |||
| + | |||
| + | |||
| + | =====5. To get a frame '''and''' have a caption for the picture===== | ||
| + | |||
| + | <nowiki>[[image:name of image.jpg|alignment|size|thumb|caption]]</nowiki> | ||
| + | |||
| + | [[image:InitialsA.jpg|right|250px|thumb|Work in progress]] | ||
| + | |||
| + | |||
| + | |||
| + | |||
| + | |||
| + | |||
| + | |||
| + | |||
| + | |||
| + | |||
| + | |||
| + | |||
| + | |||
| + | |||
| + | |||
| + | |||
| + | |||
| + | |||
| + | |||
| + | |||
| + | |||
| + | |||
Revision as of 10:13, 3 April 2008

Contents
Lorem ipsum dolor sit amet, consectetuer adipiscing elit. Morbi nulla. Sed in velit et metus fringilla gravida. Integer vitae dolor. Maecenas id odio. Ut et felis. Integer lorem. Suspendisse potenti. Fusce pharetra justo non odio. Morbi a tortor. Phasellus rhoncus. Pellentesque ac quam ac erat scelerisque ullamcorper. Nam non nisi. Proin massa. Integer dui turpis, placerat vel, elementum ut, consequat ut, arcu. Sed vestibulum, sapien nec bibendum pretium, sem nunc interdum massa, eu dapibus sapien enim nec turpis. Quisque et est. Nullam sed metus. Integer pretium dictum purus. Curabitur rhoncus.
Uploading pictures to The Wiki
Lorem ipsum dolor sit amet, consectetuer adipiscing elit. Morbi nulla. Sed in velit et metus fringilla gravida. Integer vitae dolor. Maecenas id odio. Ut et felis. Integer lorem. Suspendisse potenti. Fusce pharetra justo non odio. Morbi a tortor. Phasellus rhoncus. Pellentesque ac quam ac erat scelerisque ullamcorper. Nam non nisi. Proin massa. Integer dui turpis, placerat vel, elementum ut, consequat ut, arcu. Sed vestibulum, sapien nec bibendum pretium, sem nunc interdum massa, eu dapibus sapien enim nec turpis. Quisque et est. Nullam sed metus. Integer pretium dictum purus. Curabitur rhoncus.
STEP BY STEP SCREENSHOT HERE
Lorem ipsum dolor sit amet, consectetuer adipiscing elit. Morbi nulla. Sed in velit et metus fringilla gravida. Integer vitae dolor. Maecenas id odio. Ut et felis. Integer lorem. Suspendisse potenti. Fusce pharetra justo non odio. Morbi a tortor. Phasellus rhoncus. Pellentesque ac quam ac erat scelerisque ullamcorper. Nam non nisi. Proin massa. Integer dui turpis, placerat vel, elementum ut, consequat ut, arcu. Sed vestibulum, sapien nec bibendum pretium, sem nunc interdum massa, eu dapibus sapien enim nec turpis. Quisque et est. Nullam sed metus. Integer pretium dictum purus. Curabitur rhoncus.
This picture has been uploaded to The Wiki 
[[image:Index_fr2.jpg]]
Code for images
One single image
name | alignment | size | thumb or frame | caption
1. You can just put in the image
It will come out full size and aligned to the left with no border or caption.
[[image:name of image.jpg]]
2. You can choose horizontal alignment - right, left or center
[[image:name of image.jpg|alignment]]
3. You can choose the size
[[image:name of image.jpg||size]]
4. To get a frame round your picture
[[image:name of image.jpg|alignment|size|thumb]]
5. To get a frame and have a caption for the picture
[[image:name of image.jpg|alignment|size|thumb|caption]]
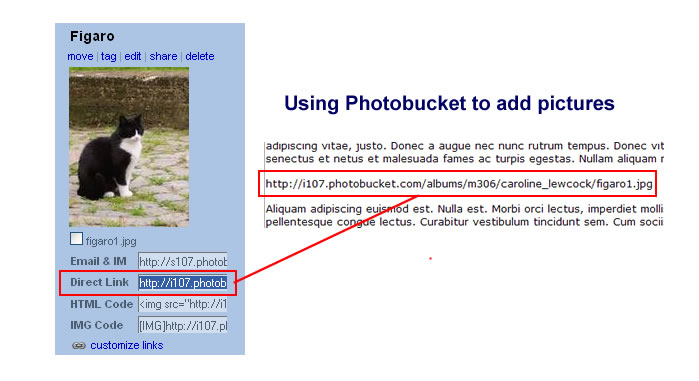
Adding images from Photobucket or other websites
This picture has been uploaded to Photobucket 
http://i107.photobucket.com/albums/m306/caroline_lewcock/a0eb401.gif
If you want to have a picture in a particular place, you need to add code.
Aligning single pictures
Left Aligned

<div align="left">http://i107.photobucket.com/albums/m306/caroline_lewcock/a0eb401.gif </div>
Centred

<div align="center">http://i107.photobucket.com/albums/m306/caroline_lewcock/a0eb401.gif </div>
Right Aligned

<div align="right">http://i107.photobucket.com/albums/m306/caroline_lewcock/a0eb401.gif </div>
Putting pictures in a row
xxxxxxxxxxxxxxxxxxxxxxxxxx


